The best Hawaiian roll slider recipes make a small sandwich feel like a proper meal: soft, lightly sweet bread, a generous savory filling, and a warm, golden top. Bake a tray for dinner, set it out for a gathering, or turn a few familiar ingredients into an easy weekend lunch.
Start with the turkey-and-cheddar sliders below, then use the six filling variations to change the tray next time. You will also find tips for keeping the bottoms from getting soggy, planning portions, and reheating leftovers.
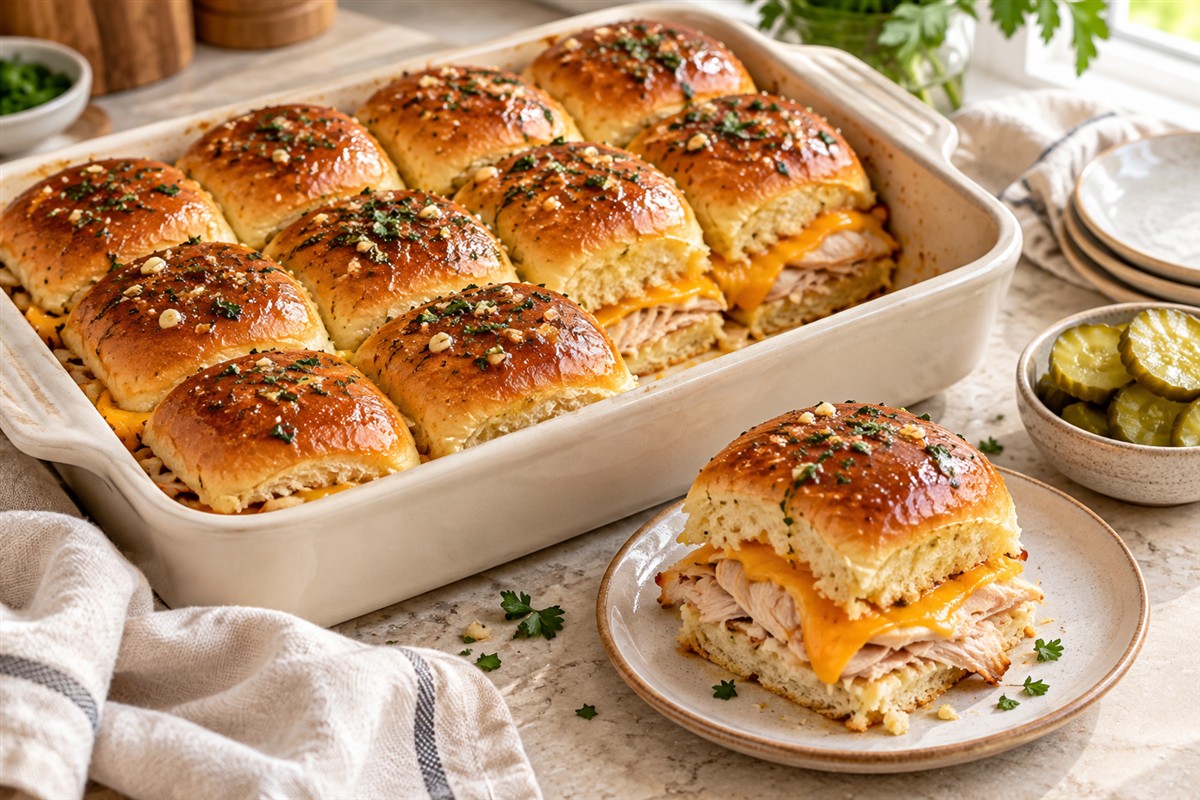
For one 12-roll tray, use about 12 ounces of cooked sliced turkey, 6 ounces of cheddar, and a light brush of garlic-parsley butter. Bake covered first to warm the filling, then uncover briefly to color the tops. Use cooked fillings throughout.
Jump to the turkey-and-cheddar recipeWhy Hawaiian rolls work well for sliders
Hawaiian sweet rolls pair naturally with salty cheese, roasted meat, and tangy sauces. Their small size also makes it easy to offer more than one filling. Keeping a connected pack together while you slice it saves time, although you can assemble individual rolls if your package has already separated.
The reference for this guide is The Kitchn’s ham-and-cheese sliders, a classic combination of sweet rolls, ham, and Swiss cheese. Follow that link for its full recipe. The turkey tray and variations here are separately written OneFamli suggestions, with different fillings and seasonings.
1. Garlic-parsley turkey-and-cheddar sliders
This mild, savory tray is a useful starting point for family dinners. Serve mustard and pickles alongside so everyone can finish their own sandwich.
Cuisine: American · Yield: 12 sliders · Prep: about 15 minutes · Bake: about 30 minutes (usually 25–30 minutes) · Rest: 5 minutes · Total: about 50 minutes. Times are estimates; check the center rather than relying only on the clock.
Ingredients
- 1 connected pack of 12 Hawaiian sweet rolls, approximately 12 ounces
- 12 ounces thinly sliced, fully cooked roasted turkey
- 6 ounces thinly sliced cheddar cheese
- 2 tablespoons unsalted butter, melted
- 1 tablespoon olive oil
- 1 tablespoon finely chopped parsley
- ½ teaspoon garlic powder
- ¼ teaspoon freshly ground black pepper
- Mustard and well-drained pickles, optional, for serving
Instructions
- Prepare the pan. Heat the oven to 350°F (175°C). Lightly grease a 9-by-13-inch baking dish. Choose a dish that holds the rolls in one layer.
- Split the rolls. Use a serrated knife to cut the connected rolls horizontally into a bottom slab and a top slab. Set the bottoms in the dish.
- Add the filling. Distribute the cooked turkey evenly, folding thin slices instead of making a thick pile in the middle. Cover with the cheddar, then replace the roll tops.
- Brush lightly. Stir together the melted butter, oil, parsley, garlic powder, and pepper. Brush over the tops and into the seams without pouring a pool around the bread.
- Warm, then brown. Cover the dish with foil and bake for about 20 minutes. Remove the foil and bake for another 5–10 minutes, checking that the center is hot, the cheese has melted, and the tops are golden. If using leftover cooked turkey, heat the filling to 165°F (74°C). Add covered time if the middle is still cool; re-cover if the tops brown early.
- Cut and serve. Rest for about 5 minutes, then cut along the roll seams. Serve with mustard and pickles on the side.
Ingredient note: Sweet rolls commonly contain wheat, eggs, and milk; cheese and butter contain dairy. Read your own package labels and check fillings and condiments for other allergens.
Six more Hawaiian roll slider combinations
Each variation below fills one 12-roll pack. Use the same assembly and covered-then-uncovered baking approach, adjusting the time for the filling’s thickness and starting temperature. All meat, poultry, eggs, and vegetables that need cooking should be cooked before assembly. These are variations, not six independently tested recipes.
2. Ham and Swiss
Swap in 12 ounces of fully cooked sliced ham and 6 ounces of Swiss. Spread 1 tablespoon of Dijon mustard thinly inside the top slab if you like a sharper finish. Keep the garlic-parsley topping, or use plain butter. Offer extra mustard at the table rather than soaking the rolls.
3. Barbecue chicken and mozzarella
Toss 2½ cups of cooked shredded chicken with ⅓ cup of thick barbecue sauce, then add 6 ounces of mozzarella. The chicken should be coated rather than dripping. Serve slaw separately for crunch, and heat the chicken filling to 165°F (74°C).
4. Roast beef, provolone, and onions
Layer 12 ounces of cooked sliced roast beef with 6 ounces of provolone and ½ cup of cooked, well-drained onions. A little horseradish sauce served alongside balances the sweet bread. Avoid pouring cooking juices into the pan; offer a small dipping bowl instead.
5. Mushroom, pepper, and cheddar
Cook 12 ounces of sliced mushrooms and one sliced bell pepper in a little oil until tender and their excess moisture has evaporated. Let the mixture stop steaming, then layer it with 6 ounces of cheddar. For vegetarian diners, check that the cheese meets their preferences.
6. Chicken pesto and provolone
Combine 2½ cups of cooked shredded chicken with 3 tablespoons of pesto and layer with 6 ounces of provolone. Skip extra parsley in the topping if you prefer. Keep sliced tomatoes for serving after baking so their juice does not soften the bread. Heat the filling to 165°F (74°C), and check pesto labels for nuts and dairy.
7. Egg, spinach, and cheddar breakfast sliders
Scramble 8 large eggs until set. Cook 2 packed cups of spinach separately, squeeze out excess liquid, and spread both over the rolls with 6 ounces of cheddar. Assemble while the cooked components are warm and bake until the middle is hot. If using refrigerated leftovers, reheat the filling to 165°F (74°C).
How to keep slider bottoms from getting soggy
- Control moisture first. Drain onions and vegetables, squeeze cooked spinach, and use enough sauce to coat a filling rather than saturate it.
- Spread the filling evenly. A thick mound in the center takes longer to heat while the outside rolls dry out.
- Brush the topping. A pastry brush gives you more control than pouring melted butter directly over the tray.
- Finish uncovered. This lets the tops color after the filling is warm. Stay nearby, sweet bread can darken quickly.
- Serve promptly. A tray left tightly covered after baking traps steam. Cut what you need, serve, and refrigerate leftovers promptly.
What to serve with sliders, and how many to make
For a light lunch, pair sliders with a crunchy cabbage salad, cut vegetables, or fruit. For dinner, add roasted potatoes and a green salad. At a gathering, pick sides that guests can serve themselves without needing another hot oven dish.
As a planning estimate, allow two to three sliders per adult when they are the main dish with sides, or one to two when there are several other substantial dishes. Appetites and roll sizes vary. A 12-roll tray might serve four to six adults for a meal; it is not automatically twelve full servings.
For 24 sliders, double the ingredients and use two pans rather than stacking the sandwiches. If your oven is crowded, rotate the pans and check the center of each tray. Add the meal to your OneFamli Meal Planner, then estimate your shopping with the grocery shopping calculator.
Make-ahead, storage, and reheating tips
To reduce work at dinnertime, portion the fillings and mix the topping ahead, refrigerating perishable ingredients promptly. Assemble close to baking for the best bread texture. A refrigerated tray can take longer to heat, so keep it covered until the center is hot. Follow your baking dish manufacturer’s instructions about moving a cold dish into a hot oven.
Refrigerate perishable sliders within two hours, or within one hour if the surroundings exceed 90°F (32°C). Use refrigerated cooked leftovers within three to four days, accounting for how old the fillings were before you assembled the sliders. Reheat leftovers to 165°F (74°C). These limits follow FoodSafety.gov’s game-day food safety guidance.
For reheating, put a small portion in a covered oven-safe dish at 325°F (165°C), then uncover briefly once the filling is hot. A thermometer is more reliable than the color of the bread. Freeze suitable leftovers promptly if you will not eat them within the refrigerator window, and thaw in the refrigerator before reheating.
Frequently asked questions
Can I use regular dinner rolls?
Yes. Choose soft rolls of a similar size. The sandwiches will taste less sweet, and different bread sizes can change how much filling you need and how quickly the tray warms.
Should I separate Hawaiian rolls before baking?
You can keep connected rolls together for quick assembly and cut them after baking. Separate rolls also work; arrange them snugly in a single layer and divide the filling evenly.
Why are the tops brown but the cheese is not melted?
The filling needs more time than the exposed bread. Cover the tray again and continue heating, checking the center. Next time, use thinner, more even layers and keep the foil on longer at the start.
Can I make different flavors in one tray?
Yes, but mark which section is which and keep similar filling thicknesses. Use separate pans when allergens or dietary restrictions require separation, and avoid sharing utensils between those fillings.
Make one tray part of next week’s plan
Choose a filling, choose two simple sides, and write down how many people you are feeding. For more prep-ahead inspiration, explore our high protein meal prep ideas.
Plan your family mealsAbout this guide: Written for OneFamli. Reviewed by: Rachel Morgan. The recipe and variations have not been kitchen-tested by OneFamli; cooking times are estimates.